In many scenarios, communication between applications in different languages are required. There are plenty of ways to solve this issue. For example, using Jython to compile the python code into JVM-compatible binary code, so that the code can be called by Java directly. Using messaging to communicate between applications is another way of doing “Remote Procedure Call” or simply pushing a message to the counterpart. Here I want to introduce how to send and receive messages between Java and python via RabbitMQ.
RabbitMQ
RabbitMQ is a messaging broker. It passes along all messages sent by different clients to different targets. In the RabbitMQ’s terminology, the clients are called providers, and the targets are called consumers. Since RabbitMQ offers quite many clients in almost all popular languages, we can write providers and consumers in almost any language. (Please see RabbitMQ for more details.)
Context
The project shown in this article is written within the Spring framework on the Java side and pika for implementation of the AMPQ protocol (RabbitMQ uses AMPQ as the messaging protocol) on the python side.
Since we need to use the RabbitMQ server to pass the messages around. Please download the RabbitMQ server here. Start the server by running the rabbitmq-server in the sbin folder.
Since the project was originally aimed to offer the possibility to a web application based on Spring to talk to a python application, so I chose Spring Boot to set up the web server. If you are only interested in the communication between a Java application and a python application, please skip the next section and jump to the “Messaging Setup” section. The project is built with the tool gradle, just download it and set the executable file in the environmental path.
Web Application Setup
Here I chose Spring Boot to build a simple stand-alone application to provide the UI for the communication. The code is similar with the sample code in Spring Boot. Clone the code from here and input the following command to run it.
gradle run
After this step, you should be able to see “hello” on the page, when you type in http://localhost:8080/home
The project can also be deployed as a normal war file in tomcat. you can run gradle build and find the war file in the /build/libs folder (the sample project has an already built war file in this folder). Just be aware of the url (you should use http://localhost:8080/{the-name-of-your-war-file}/home) if you deploy the war file instead of running it as a stand-alone application.
Messaging Setup
Since I am using Spring as the IoC container, so the code looks like this.
@Configuration
@ComponentScan("com.simonlzn")
public class RabbitMQConfig {
    private String queueName = "queue." + UUID.randomUUID().toString().replace("-","");
    @Bean
    public ConnectionFactory connectionFactory() {
        CachingConnectionFactory connectionFactory =
            new CachingConnectionFactory();

        connectionFactory.setHost("localhost");
        connectionFactory.setUsername("guest");
        connectionFactory.setPassword("guest");
        return connectionFactory;
    }

    @Bean
    public AmqpAdmin amqpAdmin(TopicExchange topicExchange, FanoutExchange fanoutExchange, Queue queue, Binding binding) {
        RabbitAdmin rabbitAdmin = new RabbitAdmin(connectionFactory());
        rabbitAdmin.setAutoStartup(false);
        rabbitAdmin.declareQueue(queue);
        rabbitAdmin.declareExchange(topicExchange);
        rabbitAdmin.declareExchange(fanoutExchange);
        rabbitAdmin.declareBinding(binding);
        return rabbitAdmin;
    }

    @Bean
    public Binding binding() {
        return new Binding(queueName, Binding.DestinationType.QUEUE, "java", "queue1",null);
    }

    @Bean
    public Queue queue(){
        return new Queue(queueName, false, true, false);
    }

    @Bean
    public TopicExchange topicExchange(){
        return new TopicExchange("python");
    }

    @Bean
    FanoutExchange fanoutExchange(){
        return new FanoutExchange("java");
    }

    @Bean
    public RabbitTemplate rabbitTemplate() {
        RabbitTemplate rabbitTemplate = new RabbitTemplate(connectionFactory());
        return rabbitTemplate;
    }

    @Bean
	SimpleMessageListenerContainer container(ConnectionFactory connectionFactory, MessageListenerAdapter listenerAdapter, RabbitAdmin rabbitAdmin) throws IOException {
		SimpleMessageListenerContainer container = new SimpleMessageListenerContainer();
		container.setMissingQueuesFatal(false);
		container.setRabbitAdmin(rabbitAdmin);
		container.setConnectionFactory(connectionFactory);
		container.setQueueNames(queueName);
		container.setMessageListener(listenerAdapter);
		return container;
	}

	@Bean
	MessageListenerAdapter listenerAdapter(MessageQueue messageQueue) {
        return new MessageListenerAdapter(messageQueue, "recv");
	}
}
If you want to write everything in pure Java, just new all instances represented by each function. Here I have defined the ConnectionFactory to set up the connection between my application and the RabbitMQ server. Two exchanges are declared here, one for sending messages and one for receiving messages (the exchanges can be defined on both provider and consumer side, it would be safer to define them on both sides). A queue and its corresponding binding are also declared to receive messages (the same declaration policy as exchanges can be applied here). In the last part, a container and a listener are declared to define the logic for processing messages when they arrive, the processing function specified in the declaration of the listener.
Let’s see the code on the python side. It is almost the same as on the Java side.
Receiver is:
# receiver
import pika
import time
import json

from send import *

connection = pika.BlockingConnection(pika.ConnectionParameters(
        host='localhost'))
channel = connection.channel()

channel.queue_declare(queue='queue2')

print(' [*] Waiting for messages. To exit press CTRL+C')

def callback(ch, method, properties, body):
    print(" [x] Received %r" % body)
    data = json.loads(body)
    print data
    time.sleep(1)
    sender = Sender()
    sender.send(body)

channel.queue_bind(exchange='python', queue="queue2", routing_key='#')
channel.basic_consume(callback,
                      queue='queue2',
                      no_ack=True)

channel.start_consuming()
Sender is:
#sender

import pika

class Sender(object):

    def send(self, str):
	connection = pika.BlockingConnection(pika.ConnectionParameters(
        	host='localhost'))
	channel = connection.channel()


	channel.queue_declare(queue='queue1')

	channel.basic_publish(exchange='java',
        	              routing_key='queue1',
                	      body='msg from python : echo ' + str)
	print(" [x] Sent 'test'")
	connection.close()
Run it
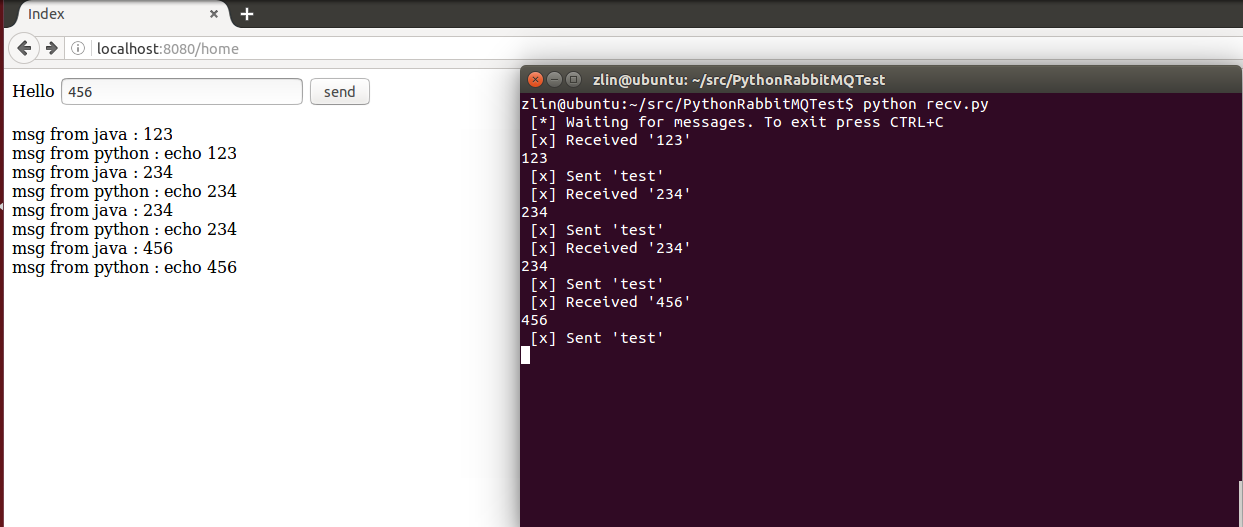
Now let’s run both Java application and python application and see how they communicate with each other. Open the main page and then type in any message you want to send to the python side. After 1 second, the python will send an echo with the same message back.
Please check out the code for more details. Java code Python code
In the Java code, the main part of the communication is in the message folder, I added a PubSub for better showing messages in the Web, if you only want to send and receive messages, the code in that folder should be enough.